Category: Tech Tips
Buying a second-hand ECU
Are you thinking of buying a second-hand ECU? You can get a great deal on a used Haltech ECU on popular sites like eBay, Facebook Marketplace, Gumtree, Craigslist or Trademe. But just like with any other second-hand product, there are some things you need to keep an eye out for.
Visual Inspection
The first thing to do is a visual inspection – Here’s what to look out for:
Check the pins inside the connector to ensure that none have been melted from a fire or because of a serious wiring problem.
Check the screws that hold the ECU cover to the backing plate – If they’re missing or look like they’ve been tampered with, it is possible someone has tried to pull the ECU apart to look inside, and there is almost never a good reason to do that. If they’re rusty, that could be an indicator that the unit is water damaged, and best left alone. Water-damaged electronics aren’t a good buy.
Have a sniff! Yes, really. Burned electronics have a distinct smell, if you can smell anything funny, walk away.

Serial Number
Do check for a serial number. It should be on a silver sticker stuck somewhere on the unit. Firstly, make sure that the sticker doesn’t say “Display” – If you’ve got one of those, it is a dummy unit someone has stolen from one of our event display stands.
Once you have a serial number, you’re welcome to email that to us at Haltech. We can give you the production date of the ECU, and tell you whether anyone has ever reported the unit stolen to us. If you happen to come across an ECU without a serial number sticker, don’t panic. Once connected to Haltech software, we can see the unit’s serial number, and give you that information.


Firmware, Software and Accessory Compatibility
If you’re looking at a Platinum series ECU, you’ll need to run Haltech “ECU Manager” software on your computer. While stable and quite capable, ECU Manager is getting on a bit now and is no longer getting any updates. Don’t let that stop you from looking at a Platinum ECU, though. They’re still a very capable unit, especially for the second-hand price.
All Elite and Nexus units now run on the current NSP (Nexus Software Programmer) and can be updated to the latest version no matter when they were manufactured.
All Nexus, Elite and even Platinum Sport ECUs have a CAN port and can make use of the bulk of Haltech’s current range of CAN devices, such as a Wideband Controller, or iC-7 Dash. CAN Keypads will not run on the Platinum range, however. Platinum and Elite ECUs share the same connectors, but be careful if you’re upgrading from a Platinum to an Elite ECU because the pinouts are slightly different. If in doubt, you can always contact our support team to help you with that.

Password Protection
Sometimes second-hand ECUs will come to you with password protection enabled. Again, don’t panic! You’re not locked out of your ECU. What you are locked out of is the “map” that was created by (or for) the previous owner. All maps/tunes remain the tuner’s intellectual property, so they’re entirely within their rights to put a password on them. While you cannot reset the password to access those maps, you can run a factory reset and set the ECU back to factory default. This is fine because if you’re buying a second-hand ECU, you’re not likely to use the old map anyway!

Haltech ECU Health Check and Repairs
If you happen to find a great deal on a second-hand Haltech ECU, only to be disappointed when it arrives and you find it is damaged, or not working, don’t despair. Haltech has an amazing after-sales and repair service, and in many cases, a Platinum, Elite, or Nexus ECU can be repaired. You can find the repair return instructions on our website.
Alternatively, if the ECU seems fine, but you want to be 100% sure it’s fully functional before you install it, you can send it to us and, for a small fee, we can test it and provide you with a condition report, just for your own peace of mind. While we’re at it we can also update the firmware and software to the latest version available.
Price Check
And finally, before you pull the trigger on purchasing a second-hand ECU, make sure you check our website and see what you’d pay for a brand new unit – It may not be a lot more than the second-hand unit you’re looking at!
Crimping vs Soldering
Does soldering really anneal the wire and weaken it? Can a crimp join really be as strong as a chemical bond? Today we dig into the fundamentals of both methods and find out once and for all which is best.
Battlelines drawn
You have probably heard people arguing about the merits of soldering your wiring connections vs crimping. The “solder is best” camp swears that soldering is more reliable because it forms a chemical bond and that soldering is less bulky and thus better. On the other side of the fence, the crimping advocates warn that the heat generated by soldering is annealing the wire and weakening it while bringing up countless examples of a cracked solder joint.
So who is right? Does soldering really anneal the wire and weaken it? Can a crimp join really be as strong as a chemical bond? Let’s dig into the fundamentals of both methods and find out once and for all which is best.
The case for solder
Soldered connections are formed by melting a small amount of alloy into and around the two wires being joined. This requires the use of a soldering iron and of course the solder material itself. As the solder material is melted, it wicks its way up and into the two wires, and when left to cool reforms as a hard interpenetrating connection that mechanically bonds the strands of two wires together. Looking at a nicely formed solder joint on the surface it’s easy to see why many people believe this to be the ultimate in joining techniques.

Its strong, its not bulky and there is excellent electrical conductivity between the two wires being joined. It’s important to note, once the join has been made, it needs to be covered by an insulating material, either heatshrink or worst case a tape join.

The crimping option
Let’s contrast that now with a typical crimp connection. In this method of joining two wires there is no heat required and no chemical bonding happening. A crimp join just uses old fashion compression to hold the join together. For joining two wires together we typically use something like these open barrel crimps, we overlap the wire and crimp down using a correctly sized crimping tool.

A crimped join is also strong join, it doesn’t need to be bulky and also offers excellent electrical conductivity between the two wires being joined. Again, after the join is made, it should be covered by an insulating material.
Good Join vs Bad Join
We need to be clear here; when done poorly – both soldered and crimped connections are a bad! A good solder join is better than a bad crimp, and vice versa a good crimp is better than a bad solder join.

The Twist-and-Tape method
Okay, let’s quickly address this well-known and frequently used technique. The twist and tape method may have its place – it’s just not in your car, and certainly not in engine management wiring.
The Verdict
So what IS the best way to join a couple of wires in an automotive wire harness? In 90% of cases, the crimp is the superior connection method in a wiring harness and that’s the method we recommend for ECU installations.
But why?
The two biggest problems with solder connections in a wiring harness is corrosion and cracking due to mechanical stress or vibration. Both of these issues are generally preventable with adequate strain relief and joint protection such as heatshrink, or better yet, heatshrink with a glue lining. Cracking of solder joins in wiring harnesses is not an uncommon occurrence, especially after many years of service. There are many examples of OEM vehicle manufacturers’ solder joints cracking or corroding causing any number of issues.
Best applications of solder
That’s not to say there is no place for solder joins in an automotive application. Wherever there is a PCB (printed circuit board) involved, we recommend using a solder join. Another instance where a solder is preferred over a crimp is where we don’t have a mating connector for a sensor and we have to make a direct wire connection between a pin and a wire. In that case we would also solder the wire directly to the pin rather than use a pin to pin connection. It’s highly recommended to also backpot the enclosure to prevent any movement of the wires away from the pin.
Is more better?
If crimping is good, and soldering is not as good but still OK – then is soldering a crimp join the best option available, being a combination of both methods? The simple answer to that, even if it’s somewhat counter intuitive, – is no. Adding solder to a crimp join does not improve the crimp. In fact, it’s detrimental because the additional heat that is added to the wire and the solder inevitably wicks up the wire and can actually weaken the wire itself making the join more susceptible to cracking.
Before you start crimping or soldering
First get a quality set of crimping tools, they’ll make the whole process a lot easier. Find a reliable supplier of open barrel crimps in a multitude of sizes for joining one, two or ten wires together. Get some heatshrink, again in a variety of lengths and diameters. We recommend using a quality glue lined heathrink where the space allows. Don’t forget to add the heatshrink to the the join BEFORE you make the join.

And finally – Don’t be afraid to pull out the soldering iron to make those one-off random connections, but only if you have a way of mechanically retaining the entire join.
Current Basics: Volts, Amps and Ohms
In this article we are getting nerdy about electrons. To be more precise, we are discussing why choosing the right wire gauge is important and why an incorrectly sized wire gets hot. We also go through the governing rules that dictate how much current a circuit is going to draw.
The Basics
Before we even get into the volts, amps, and resistance let’s look at some of the basic types of electrical circuits we deal with in an automotive system.
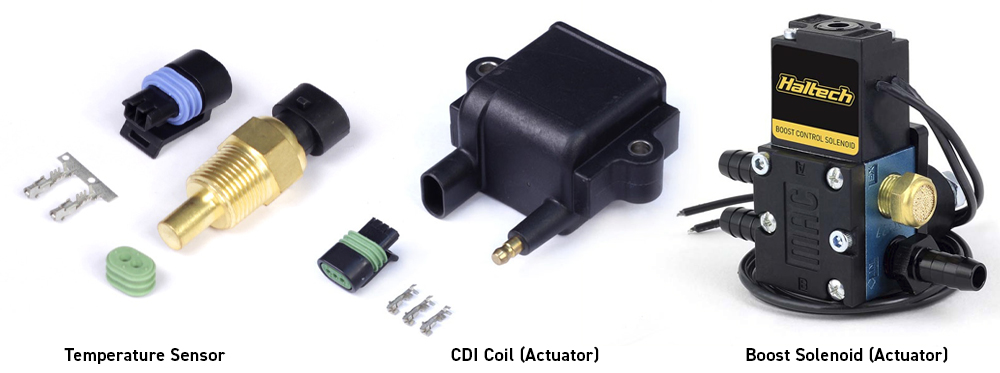
Within the engine bay and from an engine control perspective there are two major types of circuits we deal with. We have sensors, which relay information into the control system, and actuators that are being controlled by a control system – either an ECU or PDM. The actuator is just a technical name for the things in the engine bay that actually do something, like fuel injectors, ignition coils, fans, pumps, solenoids etc. These are the components that the control system is actually turning on and off to make something happen in the physical world.
Today’s discussion of circuits is going to concentrate mainly on the actuators because these are the components that have the highest potential for things to go wrong. For example, if you size the wiring to the fuel pump inadequately, you may end up creating enough heat in the wiring to turn a small electrical problem into a serious fire risk.
Ohm’s Law
Why is getting the gauge (or thickness) of the wire important for an electrical circuit? The gauge of a wire required is proportional to the amount of current the circuit is drawing and the current being drawn is proportional to the resistance. This is where our old friend Georg Ohm steps in with Ohm’s law.
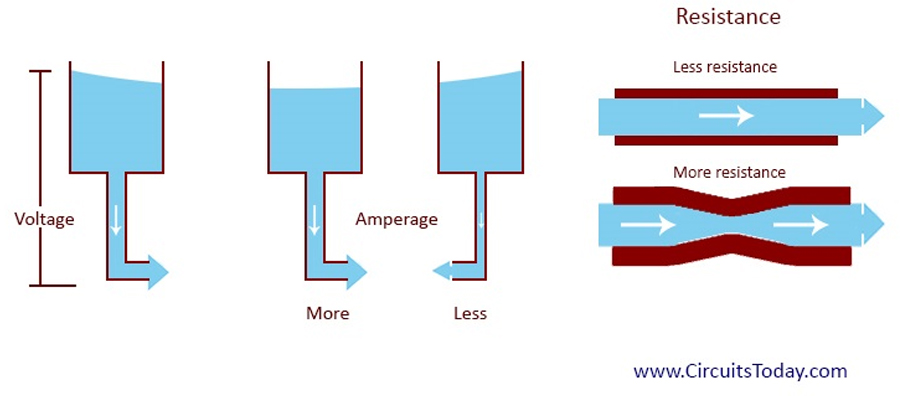
Ohms law is what we use to relate current, voltage and resistance. And Ohms Law states that:
Voltage = Current x Resistance (or V=IR)

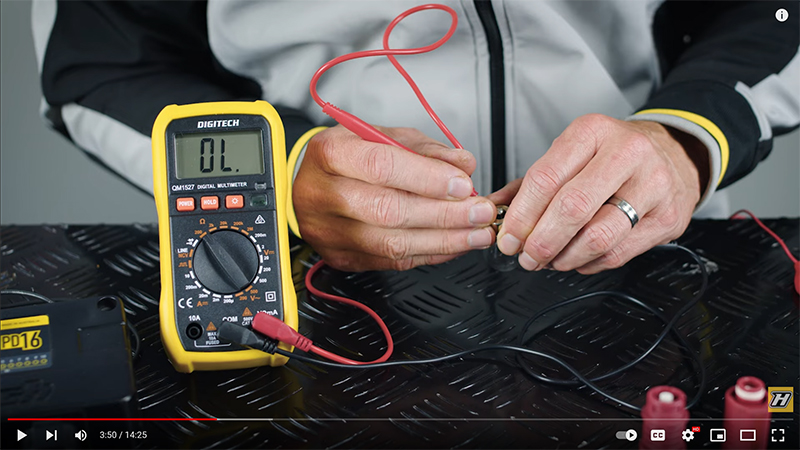
What does that mean for powering up a light globe, a fuel pump, a nitrous solenoid or any other device in our engine bay? Traditionally we’d use a 12V electrical system, or when the engine is running 13.8V. ( That’s what the alternator is regulating the voltage to, in the real world that could be 14.2, 14.4 or even 16V depending on your particular application. If you are not sure, just grab a multimeter, set it to DC Voltage and measure what the voltage is across your battery with the engine running.)
So let’s say we’re using 13.8V, and, according to Ohm’s Law (voltage = current x resistance), all we have to do is measure the resistance of the device we are trying to run to calculate the amount of current that device will draw.
Now that we know the theoretical amount of current the device should draw we can go about sizing up not only the wiring but also ensuring we select an appropriate set of plug and pins to use for each device.
The simplest and most practical way of sizing your wiring appropriately is to use an online wire gauge calculator like this one by wirebarn.com. You simply input the voltage, current and length of wire and the calculator will provide you with a minimum wire gauge for your application.
Why girth is important
Anyone who has used a wire too small for the intended application knows that too thin a wire gets hot, really hot – but why? Why does this heat get generated in a thin wire but not a thicker one?
The answer to that one gets even nerdier and goes all the way down to the sub-atomic level of electrons passing down from one molecule of copper to the next molecule of copper in length a wire.
Amps (or current flow), is a measure of the actual number of electrons that are being moved through your circuit. Imagine having to move the same number of electrons through a very thin wire, as opposed to a very thick wire. The best way to illustrate it is with a water hose analogy. Say we have to move the same volume of water through a regular garden hose (that’s our thin wire) and a commercial-size water pipe that supplies water to an entire suburb (that’s our thick wire).
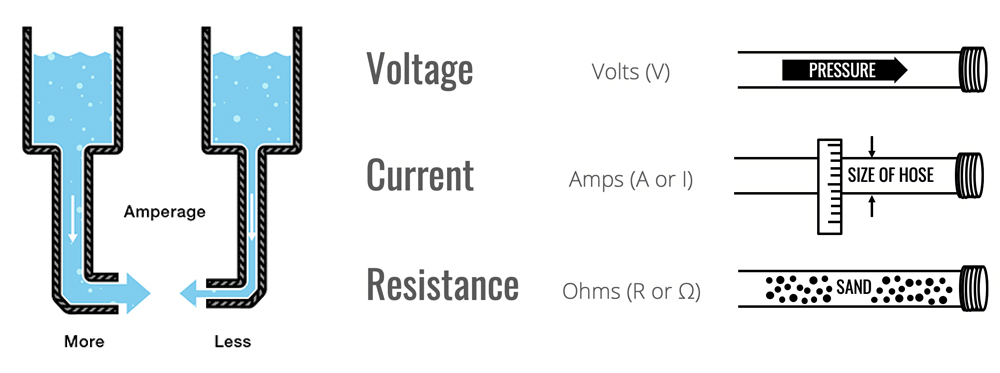
The water in the commercial-size pipe is moving much slower down the pipe to deliver the same flow rate as thinner the garden hose.
That’s because the speed at which the water moves along the hose is directly proportional to its diameter for any given flow rate. This example is exactly the same as electrons moving through a wire – the electrons need to move much faster through the thinner wire to provide the same volume out the other side.
Why does this matter? The faster the electrons have to move in the wire, the more heat they generate. So when we are pushing a very high volume of electrons through a very thin wire, they’ll still go through but they’ll generate a lot of heat because they are having to move very fast. If you ask for a lot of current and for a long period of time, that heat can get too much for the wire covering, and that is where you let the smoke out!
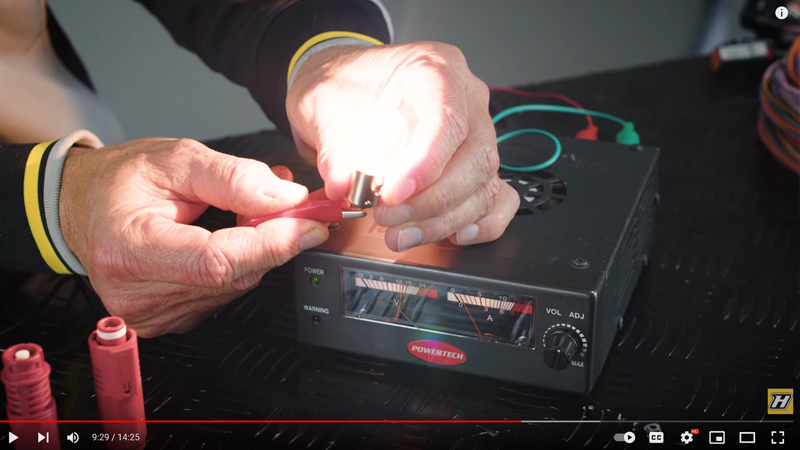
If you haven’t watched the video at the start of this article, now would be a good time to do it as it shows a practical example of this using a simple light globe.
A light globe like the one used in our video is a perfect example of leveraging the fact that when you draw enough current through a wire, it’ll heat up.
The only difference here is that we use this to our advantage in a light globe, by intentionally getting the wire red hot so that it provides us with light.
Real-World Practical Applications
Using Ohm’s Law we can calculate the expected current draw on any circuit. Armed with this information we can appropriately size the wiring to high-current devices. We also know why and how things can go pear-shaped when we undersize the wiring.
We also need to remember that just measuring the resistance of a component may not always tell us the full story about the amount of current the device will draw in real-world applications. Fuel injectors and ignition coils are switched on and off at high frequencies, so while you can measure the individual component resistance and calculate the current draw – the total current draw for the fuel or ignition system varies significantly with things like RPM and engine load.
The real-world practical application of Ohm’s Law actually requires a little more thought because it’s nuanced. The good news is, devices like the Haltech PD16 can give you real-time measurements of the actual current being drawn by a circuit and the ability to either shut it down or leave it active for a predetermined period of time. Using a device like the Haltech PD16 gives the user full control and diagnostics over the entire vehicle’s electrical system.

